The time of the twisted screen has arrived since the appearance of Samsung S6 Edge. Following a long time of progression, a crisp out of the case new twisted full screen has been grasped from Samsung repair shop, which comes as a blend of twisted screens and full screens.
Differentiated and twisted screens, the new twisted full-screen point of fact bears a significantly higher fix/remodeling cost. In our video today, we will take Samsung Galaxy Note 8 for example and show you the latest twisted full-screen reestablishing development. Our REWA is glad to share fix tips with you and helping with understanding your issues counseling Samsung cell phone fix.
# 1 – Cracked Screen Testing
Limit test – Display and Touch
Both are OK
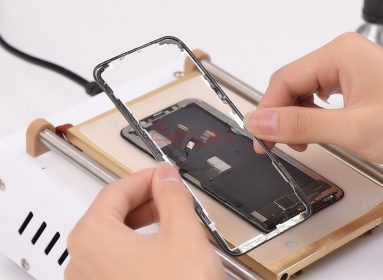
# 2 – Phone Disassembling
Recognize the phone upside down on the Heat Platform, empty the back spread step by step with Pry Piece and Glue Cleaner. (Be careful of flex joins while working) Continue to discharge the back plate. Take out the battery and some various embellishments, by then take out the motherboard.
# 3 – Glass Lens Separating
Put the OLED screen get together into the – 180℃ Frozen Screen Separator, the get the top on and keep things under control for 5 minutes and remove the glass point of convergence warily. Next, place the room temperature OLED screen on the Heat Platform, clear residual glue with the Electric Glue Removing Device. At the point when done, clean with N-hexane.
# 4 – Mid-layout Separating
Approaching to Samsung mobile repair centre fixes every issue. Put the OLED screen into the – 180℃ Frozen Screen Separator, get the spread on and hold on for 5 minutes. Furthermore, a while later separate the OLED screen from the mid-layout.
# 5 – OCA Laminating
The OCA should be secured to the glass point of convergence from the beginning. Recognize the structure into the overlaying machine, press ‘OCA spread’ button and the machine starts to work until the Laminating wrapped up. Next, take out the OCA associated glass point of convergence
# 6 – Bubble Removing
Put the OCA joined glass point of convergence into Bubble Removing Machine for 5 minutes, when finished; take out the OCA annexed glass point of convergence.
#7 – OLED Laminating
By and by we need to overlay the OCA associated glass point of convergence to the OLED screen. In the first place, place the structure into the covering machine, press ‘LCD overlay’ button. By then the machine starts to work till the Laminating wrapped up. Last, take out the OLED screen get together.
#8 – Bubble Removing
Put the OLED screen gathering into Bubble Removing Machine for 10 minutes. At the point when finished, take out the OLED screen gathering.
# 9 – Refurbished Screen Testing
Samsung Galaxy Note 8 screen fixing completed perfectly
The above is the completed technique of Samsung Galaxy Note 8 broken screen glass fix. Do you have it? If NOT, watch the video underneath. Then, have you met any issue during the part screen remodeling? In case YES, welcome to confer to us at comment underneath or ask gathering. Our REWA is anxious to share fix tips with you and helping with fathoming your issues. As a natural aphorism ” if three walks together, one can be my instructor”. We can pick up from each other. To wrap things up, You prepared for parts displacing in a manner of speaking?